
Heatwaves, gusty balconies, and dry spells don’t have to wreck your living wall. With a few smart choices, your vertical garden can handle weather swings and still look great. This guide shows you how to plan, plant, and maintain a climate-resilient vertical garden—from substrate and irrigation to shade, wind control, and weekly routines. You’ll get a simple weekend setup, practical schedules, and quick fixes for common problems.
Why climate resilience matters for vertical gardens
Vertical gardens dry out faster than raised beds because they have more exposed surface area and smaller soil volumes. They can also act like sails on windy balconies and heat up quickly against sunny walls. Building resilience means:
- Fewer emergencies. No more “everything wilted by lunch” days.
- Healthier roots. Stable moisture and temperature = steady growth.
- Lower costs. Less water waste, fewer plant replacements, and minimal hardware upgrades.
- Year-round looks. Flowers keep blooming, foliage stays perky.
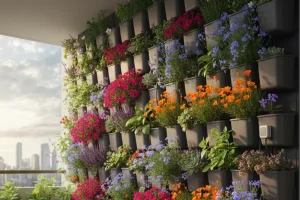
Pick the right system style (and tweak it for toughness)
Pocket panels & rails (soil-based)
- Why they’re good: Forgiving, easy to mulch, hold moisture longer.
- Risks: Heavy when saturated; can heat up on dark walls.
- Resilience tweaks:
- Add a plastic back liner or waterproof membrane to protect the wall and slow evaporation.
- Choose light-colored panels to reflect heat.
- Use deeper pockets in the top row; they dry first.
- Add a plastic back liner or waterproof membrane to protect the wall and slow evaporation.
Towers (stackable or column)
- Why they’re good: Compact footprint, fast to shade, easy to rotate.
- Risks: Top tiers cook and dry first; tall stacks catch wind.
- Resilience tweaks:
- Add a wider, weighted base (sandbags, pavers, or a ground screw outdoors).
- Run pressure-compensating drip emitters (2 L/hr) to each tier for even water.
- Rotate the tower 90° weekly to even out sun exposure.
- Add a wider, weighted base (sandbags, pavers, or a ground screw outdoors).
Hybrid options
- Reservoir rail under panels to catch runoff (and return a little via capillary matting).
- Double-face setups (shade-loving plants on the cooler side, sun-lovers on the bright side) for courtyards and pergolas.
Media that manages heat and drought
Your mix should drain fast and hold enough water to bridge hot hours.
- Mix recipe (soil-based): 45% high-quality potting mix + 30% coco coir + 15% perlite or pumice + 10% screened compost.
- Why it works: Coco stores moisture without going soggy; perlite/pumice keep air around roots; compost adds slow nutrients.
- Helpful add-ons:
- A tiny dose of wetting agent so water spreads evenly in heat.
- Water-holding crystals only in the top row (use sparingly to avoid oversaturation).
- A tiny dose of wetting agent so water spreads evenly in heat.
- Mulch the surface: 1–2 cm of coco chips, fine bark, or straw reduces evaporation and buffers heat on the root zone.
Plant palette that forgives rough weather
Heat-leaning herbs & edibles
- Rosemary, thyme, oregano, sage (woody, drought-smart).
- Peppers (compact), dwarf tomatoes (sunny balconies).
- Malabar spinach, New Zealand spinach (love heat, keep producing).
Flower workhorses for hot, dry spots
- Zinnia (dwarf), verbena, portulaca, lantana (compact), gazania, vinca (Catharanthus), calibrachoa.
- Silver foliage (helichrysum, dwarf artemisia, lamb’s ear ‘Silver Carpet’) reflects light and stays cool.
Cooler or sheltered rows
- Nemesia (heat-tolerant strains), violas, marigolds, dwarf salvias.
- Put thirstier plants mid-wall where evaporation is lower.
Layout tip: Top row = toughest plants (sun + wind), middle = moderate, lower = tender or shade-tolerant.
Shade, wind, and water: your three levers
1) Heat & sun management
- 30–40% shade cloth for afternoons (clip on/off as needed).
- Reflective backing (light-colored wall, or a thin foam board with foil face) cuts radiant heat behind panels.
- Light-colored containers absorb less heat.
- Grow lights indoors? Run them early morning or late evening to avoid extra midday heat.
2) Wind control
- Anchor hard. Use wall anchors matched to your surface and a bottom ledger for panels; weight towers.
- Wind baffle on the exposed side: clear polycarbonate sheet or mesh reduces gust force but lets light through.
- Soft ties and mini trellises keep tall stems from snapping.
- Plant placement: Flexible, low-profile species on the windward edge; taller bloomers behind the baffle.
3) Water strategy
- Morning watering only. Plants start the day hydrated; foliage dries fast; disease risk stays low.
- Pulse irrigation for towers: 2–4 minutes on, 10 minutes off, repeat 2–3 times in the morning during heatwaves—better absorption, less runoff.
- Top row bonus: Add +1 minute or a second emitter to the top tier if it chronically dries faster.
- Weekly leach with freshwater to push out salts—especially if you use reclaimed water at any point.
Feeding for resilience (not flop)
- Base feed: Slow-release, balanced fertilizer at planting time.
- Liquid support: Half-strength bloom or balanced feed every 2–3 weeks in active growth.
- In heatwaves: Cut liquid feed by half (or skip that week) to avoid soft, scorch-prone growth.
- Micronutrients: A light kelp/seaweed foliar (morning only) can help stress recovery—avoid spraying open blooms.
A one-weekend resilience upgrade
Saturday morning — Secure the structure
- Add extra anchors and a bottom ledger for panels; check all screws.
- For towers, place on a level tray, add paver weight or sandbags; confirm no wobble.
Saturday afternoon — Climate helpers
- Clip 30–40% shade cloth at the top rail with bungees; leave sides open for airflow.
- Mount a clear wind baffle on the gusty side (heat-resistant zip ties or brackets).
- Install reflective backing behind panels if wall bakes.
Sunday morning — Media, mulch, and plumbing
- Top off pockets with the coco/perlite mix; mulch everything.
- Replace or add pressure-compensating emitters (2 L/hr).
- Program a morning schedule (see below).
- Group plants by thirst: top = toughest, mid = moderate, bottom = tender.
Smart schedules that actually work
Soil panels & rails
- Spring/fall baseline: 3–4 minutes, every other morning.
- Summer/heatwave: 3–4 minutes, daily; add a second short cycle if wilting persists by noon.
- Rainy/cool periods: 2–3 minutes, every 2–3 days (skip if top inch is moist).
Towers
- Spring/fall baseline: Pulse 2 minutes ON / 10 minutes OFF × 2 in the morning.
- Summer/heatwave: Pulse × 3; add +1 minute for top tiers if needed.
- Cool periods: Pulse × 1 or every other day.
Weekly freshwater leach
- Once per week, run double time with clean water to move salts past roots.
Manual check: Lift a sample module or pocket—light = water now, heavy = wait. This “hand scale” is more reliable than guessing by sight.
Maintenance that prevents 90% of issues
- Deadhead weekly. Plants redirect energy to new blooms (and look fresher).
- Trim leggy growth after heat spikes to encourage branching.
- Airflow indoors: Quiet clip fan on low, angled across the wall, not directly at leaves.
- Clean emitters monthly (warm water + a splash of vinegar), then flush lines.
- Inspect anchors after big winds; retighten anything loose.
Troubleshooting quick wins
- Midday wilt that recovers by evening: Normal heat response; don’t chase it with extra water unless plants are still wilted next morning.
- Crispy leaf edges (scorch): Increase shade cloth coverage or step up morning water by 1 minute.
- Uneven wetting across rows: Add a second emitter to the driest column or slightly throttle the wettest with an inline valve.
- Flowers stalling in heat: Reduce nitrogen, add light afternoon shade, and deadhead more often.
- Stems snapping on windy days: Move tall bloomers behind the baffle; add soft ties at two heights.
Common mistakes (and how to fix them)
1) Watering at night
- Why it hurts: Wet foliage + warm nights = mildew.
- Fix: Morning only. Use a timer lockout after 6–7 p.m.
2) Same schedule for every row
- Why it hurts: Top dries first; bottom stays soggy.
- Fix: Zone timing or add an emitter to top tiers; reduce flow to the bottom if needed.
3) Over-shading all day
- Why it hurts: Leggy growth, fewer blooms.
- Fix: Use 30–40% cloth and target the hottest hours only.
4) Dark pots against a dark wall
- Why it hurts: Heat absorption bakes roots.
- Fix: Light-colored containers or a reflective backing.
5) Skipping mulch
- Why it hurts: Evaporation skyrockets; media crusts.
- Fix: 1–2 cm coco chips or fine bark everywhere.
6) Loose mounts on windy balconies
- Why it hurts: Micro-movements cause leaks and plant stress.
- Fix: Upgrade anchors, add a bottom ledger, weight the base.
Action checklist (copy/paste)
- Install 30–40% shade cloth for hot afternoons
- Add reflective backing or lighten wall/pot color
- Switch to coco-rich, airy mix + mulch
- Use pressure-compensating 2 L/hr emitters
- Program morning-only watering (pulse for towers)
- Weight/anchor frames; add a wind baffle if gusty
- Deadhead weekly; trim after heat spikes
- Flush weekly with freshwater to prevent salt buildup
Conclusion: small tweaks, big stability
A climate-resilient vertical garden isn’t about buying expensive gear. It’s about balanced media, smart watering, targeted shade, and solid anchoring. Put your toughest plants on top, mulch everything, pulse water in the morning, and buffer the wind. With those habits in place, your wall will carry color and growth through heatwaves, breezes, and drought—no drama required.
Hi, I'm Evelyn. I grew up in a house, but life brought me to apartments. In vertical gardening, I’ve found a hobby full of life and fun challenges. It's a way to turn even the smallest space into a green retreat.